Just a few months before this test, we would have unquestionably suggested a cast option to anyone looking for a bolt-on, stock DSM flange manifold. It has long been the consensus that “cast is king” in the DSM bolt-on turbo world. However, people kept asking and new bolt-on turbo options were being developed, so we revisited it with a really slick design and we wanted to give it a shot with and see what it could do.
So here we are, and here is the test!
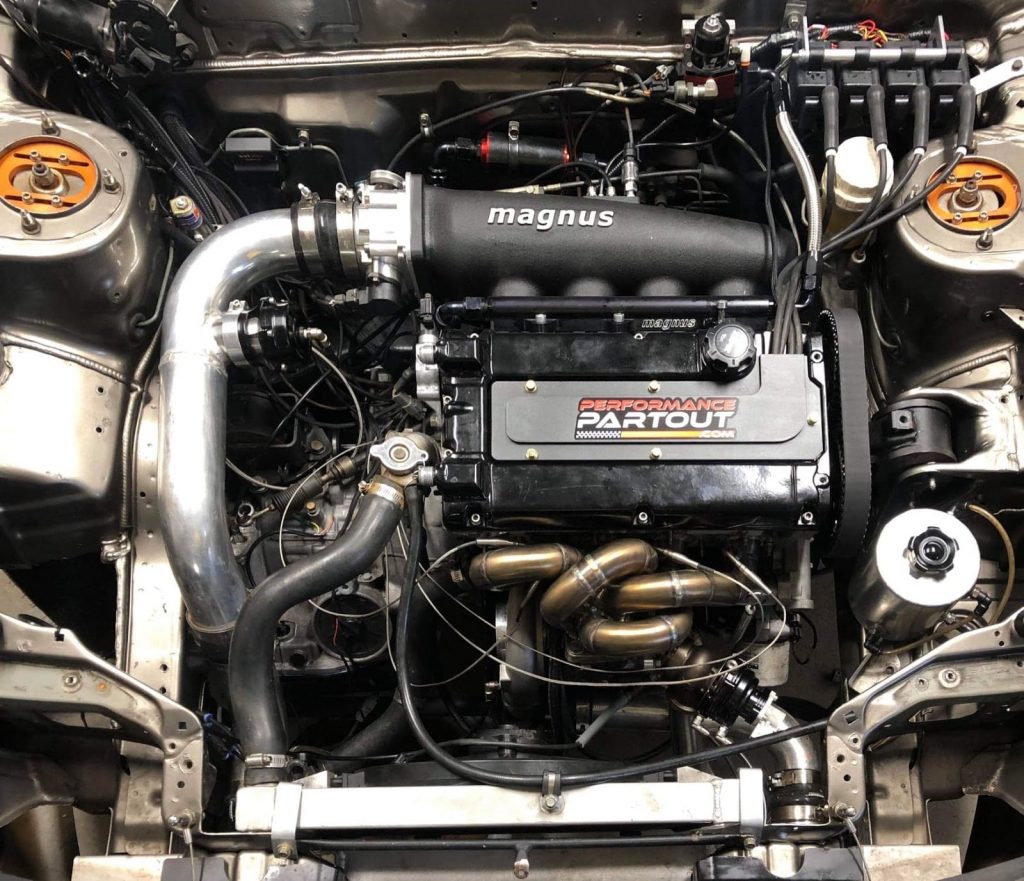
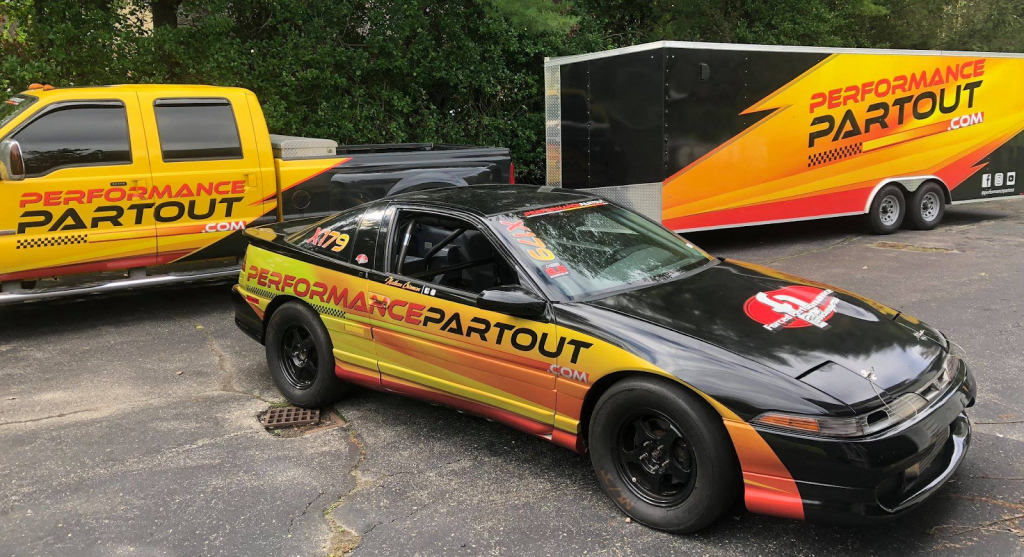
First off, a huge, HUGE thank you to Nathan Crisman. Many things came up along the way in order to get the car in testing condition, and he tackled it all with urgency- just to get the testing and data out there for everyone ASAP.
Dyno Test Background and Methodology:
This test was done on Nathan’s 2.0 auto 1g DSM with both the Morrison Fabrications (MF) DSM bolt-on manifold and venerable Forced Performance (FP) cast race manifold. It was performed at M.R. Performance in Mineola, NY on January 10, 2020, using a Mustang chassis dyno with the FP manifold installed for baseline runs. Two initial pulls were performed at wastegate pressure to ensure proper dyno settings, calibration, and vehicle base tuning and are not included in this test presentation. Six pulls were performed with closed loop boost control targets of 36psi, 40psi, and 44psi – two pulls at each respective target with minor adjustments made to the boost control base duty cycle on the second of each target level to hit and maintain the target boost level for an accurate comparison. The Morrison Fabrications manifold was then installed while still strapped to the dyno, with seven more pulls performed: 2 @ 36psi, 1 @ 38psi, 2 @ 40psi, and 2 @ 44psi boost targets. Again with the same procedure for adjusting the boost control base duty cycle map to most accurately hit the target boost level.
*Nathan later found the wastegate to be badly leaking boost from a loose component, causing a progressively larger variance in actual boost levels with the MF manifold runs vs the FP runs.
No changes were made to the fuel maps, ignition timing maps, or any other mechanical or electrical systems on the test vehicle during the testing procedure to ensure consistent and unbiased test results.
Design factors involved in the manifolds used:
The FP Race manifold has larger runner diameters vs the MF manifold, but the MF has smoother bends, near equal runner length, and a much better angle of entry at the collector.
Data Analysis:
Pulls overlaid at 36, 40, and 44psi boost targets. It is important to note the boost psi labelled in each run are only targets, as there wasn’t enough time/runs to perfectly dial in the same boost throughout the run on each manifold (and the MF typically lowering boost with no other changes, and the above leaking issue). The Morrison Fabrications manifold is in red, and the FP Race cast manifold in blue. Shown are horsepower (thick solid), torque (thin solid), and actual boost (dotted). Below each run is a graph that compares the horsepower differences along side the differences in boost pressure at each rpm.

Up first, 36psi. The FP manifold varied between 38-37psi and the MF held a pretty solid 36.5psi, with the FP manifold having a higher boost average (except for part of the spool up range). Despite the FP manifold being at an advantage in boost vs the MF, the MF made more power everywhere except for the last 800rpm, from 8200-9000rpm. The MF power gains are partly from the quicker spool, but even at 5800rpm there is a nearly 60whp power gain! The power gain varied between 10-25whp up to 8000rpm, even with ~1psi less boost. From 8200-9000rpm the FP had a 0.5psi and 10whp advantage over the MF.
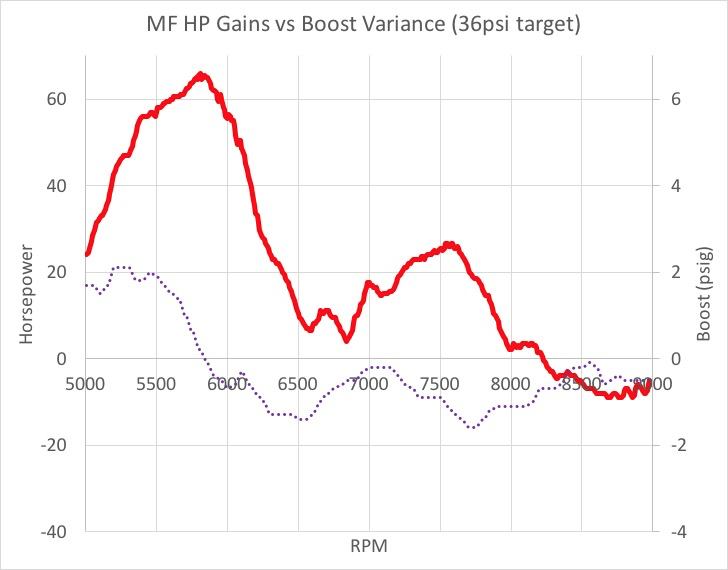
Solid red: Horsepower advantage (above 0) for the MF vs FP
Dotted purple: Boost variance between the two manifolds during the pull (above 0 is a boost advantage for the MF, below 0 is a boost advantage for the FP)

The 40psi pulls ended up much closer in boost between the two, with the MF being higher by ~1.7psi initially (quicker spool) and then the FP being higher from ~7500rpm to the end of the pull. There is a very similar trend as before of more power (even at less boost) all the way up to 8750rpm where both the MF and FP power curves merged, with the FP at a 1.5psi and 4hp advantage at 9000rpm.
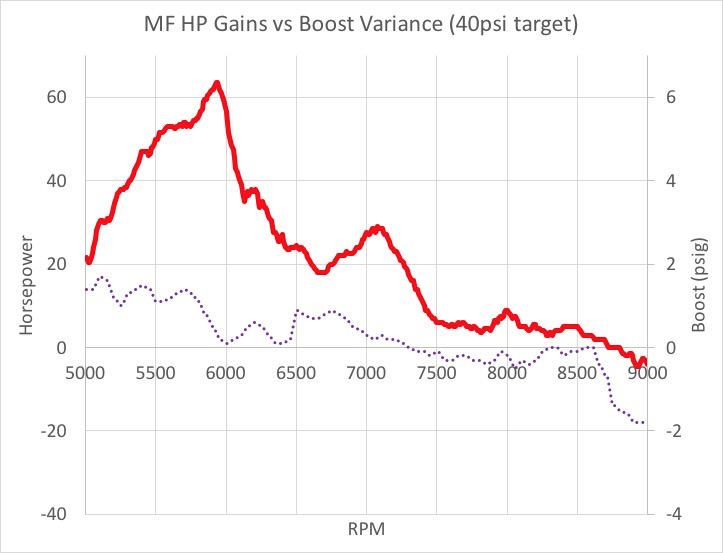
Solid red: Horsepower advantage (above 0) for the MF vs FP
Dotted purple: Boost variance between the two manifolds during the pull (above 0 is a boost advantage for the MF, below 0 is a boost advantage for the FP)

Finally, the 44psi pull. In this run, boost was already expected to drop from the 44psi target at high rpm due to the turbo being at its flow limits at the 800hp range. The MF manifold had a harder time holding boost than the FP (the MF actually held boost better and made more power in its previous 40psi run) and was down by 2-3psi by the end of the pull.
From the beginning at 5000-7000rpm, however, the MF manifold had a 20-60whp power advantage, despite a mostly lower boost level. After 7000rpm, the power advantage diminished along with boost until both the MF and FP made the same power at 7600rpm. At this point, the MF had 2psi less boost, and continued to drop power and boost, while the FP manifold kept making power to 8750 with 3psi more boost.
*The later runs of the day and holding boost getting progressively worse was likely due to the wastegate position sensor loosening up and bleeding off boost, which fell off completely the next time the car was ran at the track*
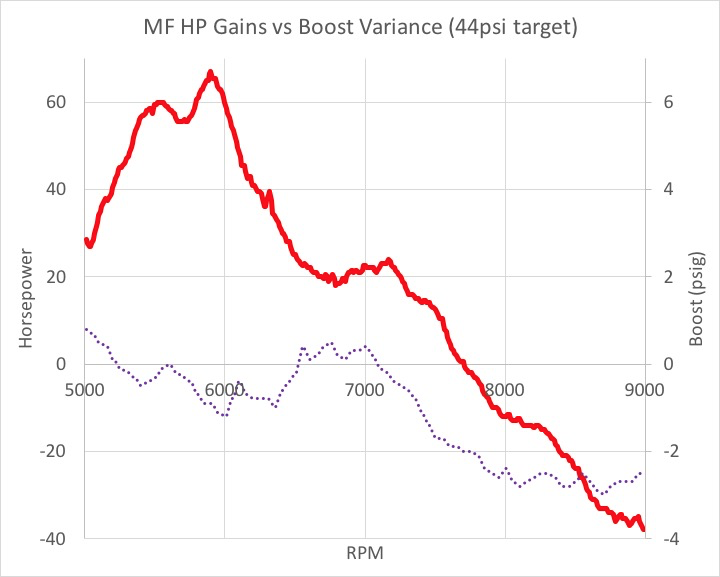
Solid red: Horsepower advantage (above 0) for the MF vs FP
Dotted purple: Boost variance between the two manifolds during the pull (above 0 is a boost advantage for the MF, below 0 is a boost advantage for the FP)
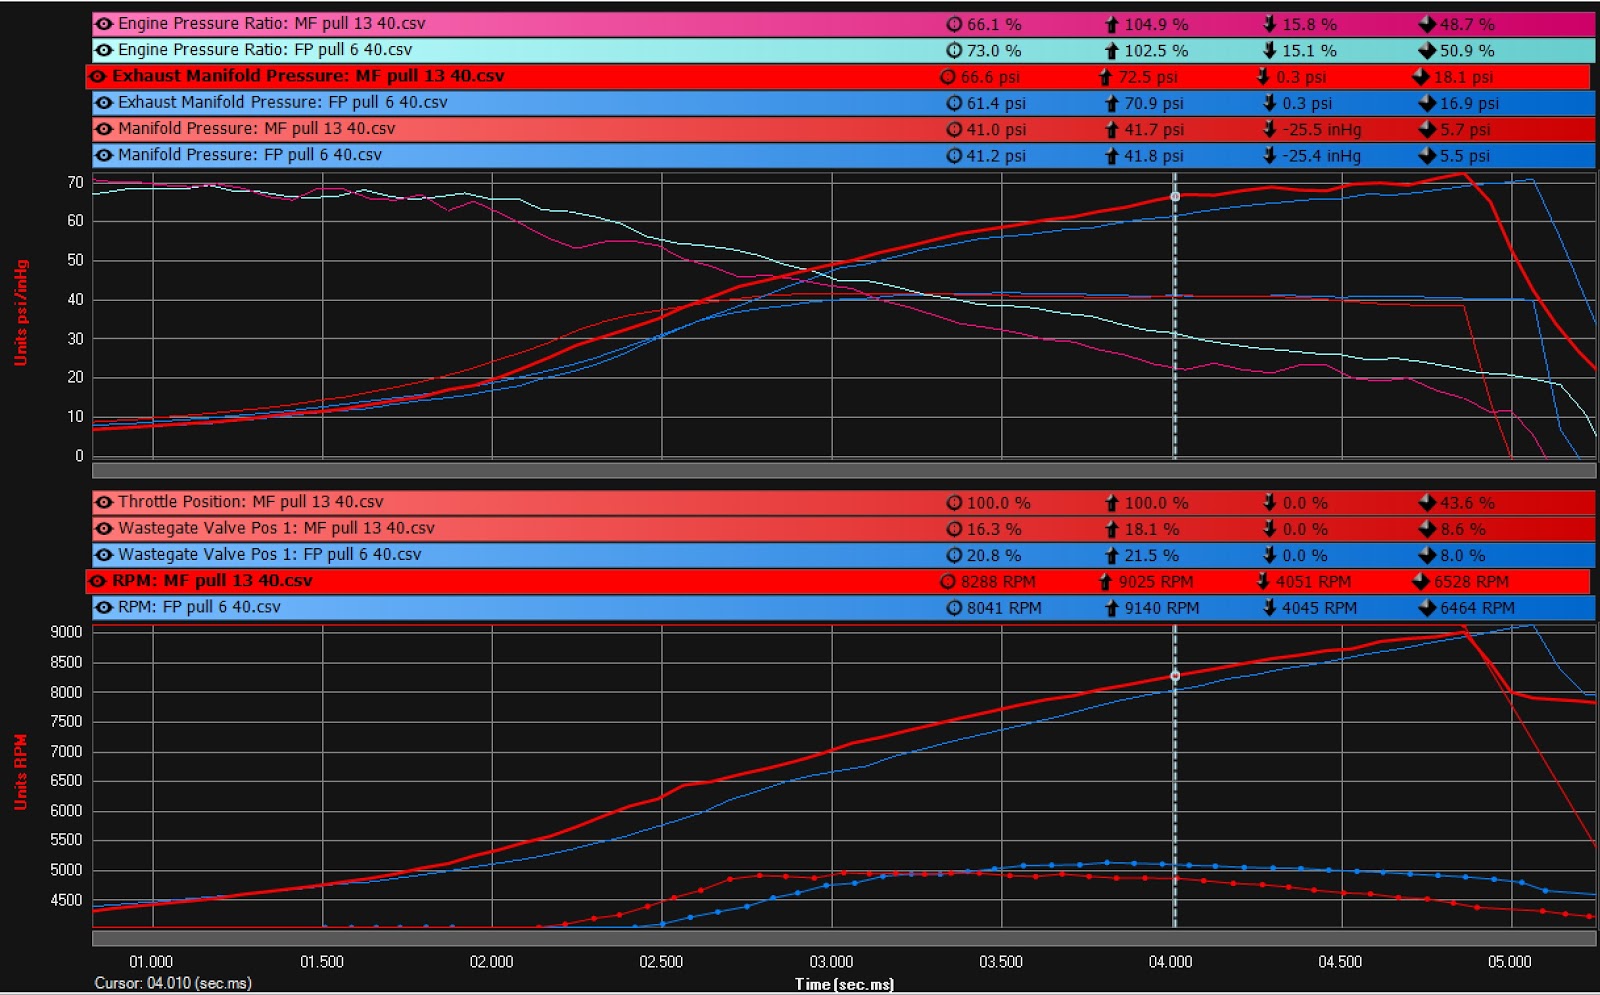
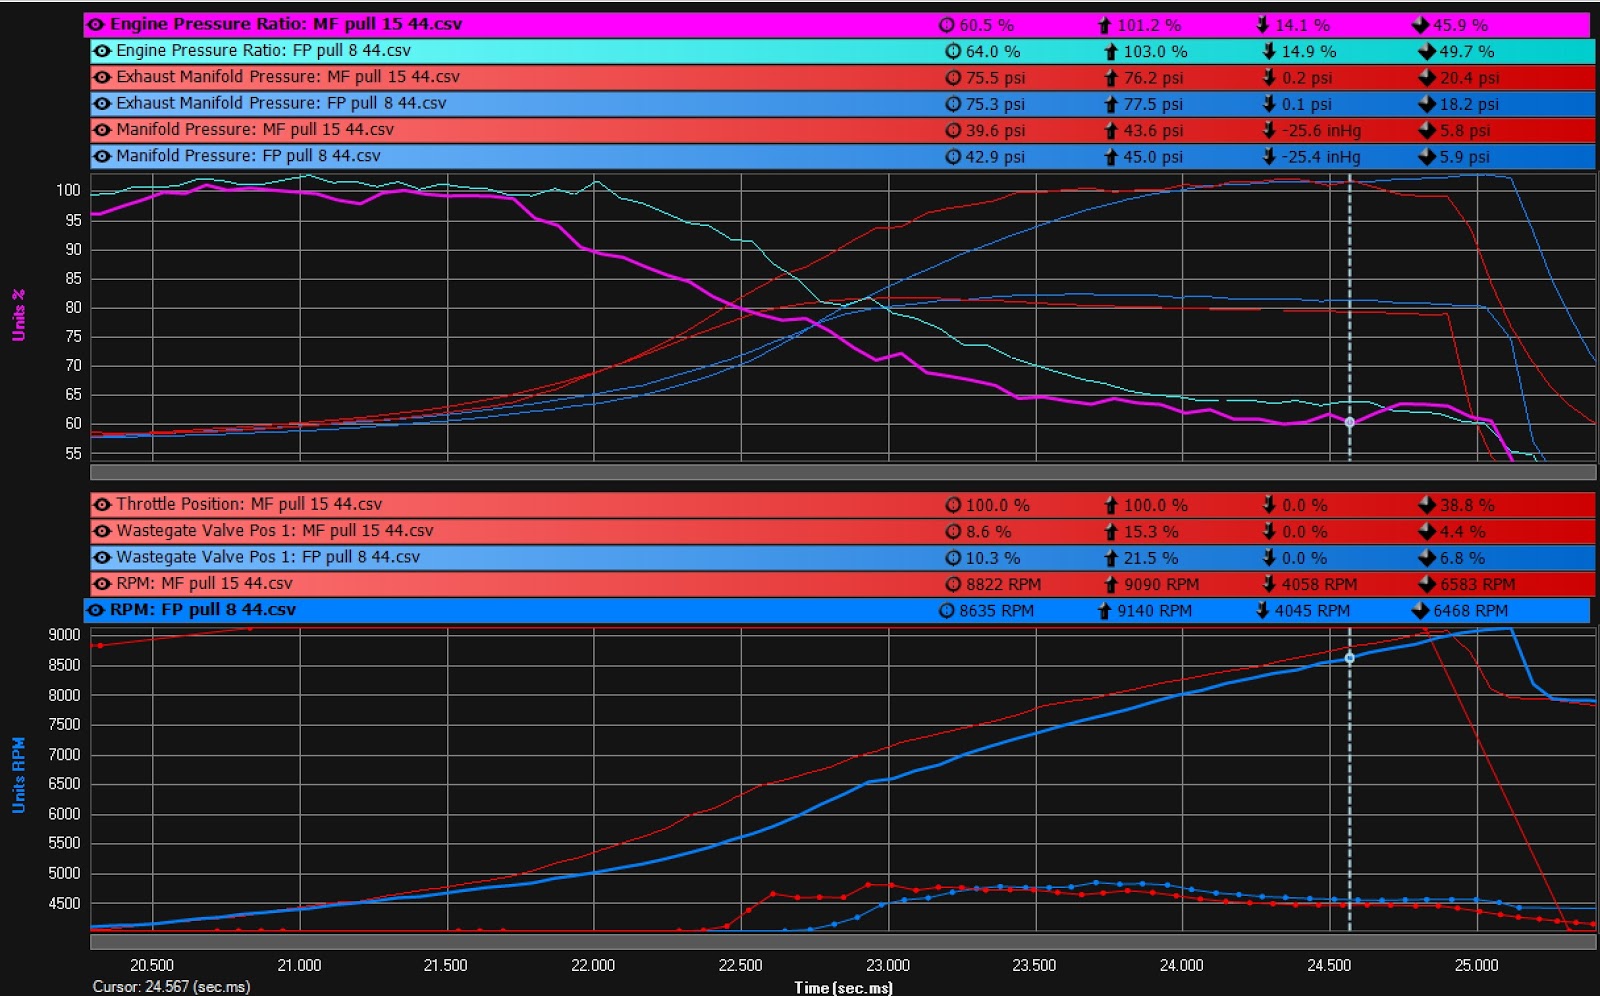
Logs, 36psi, 40psi, 44psi targets: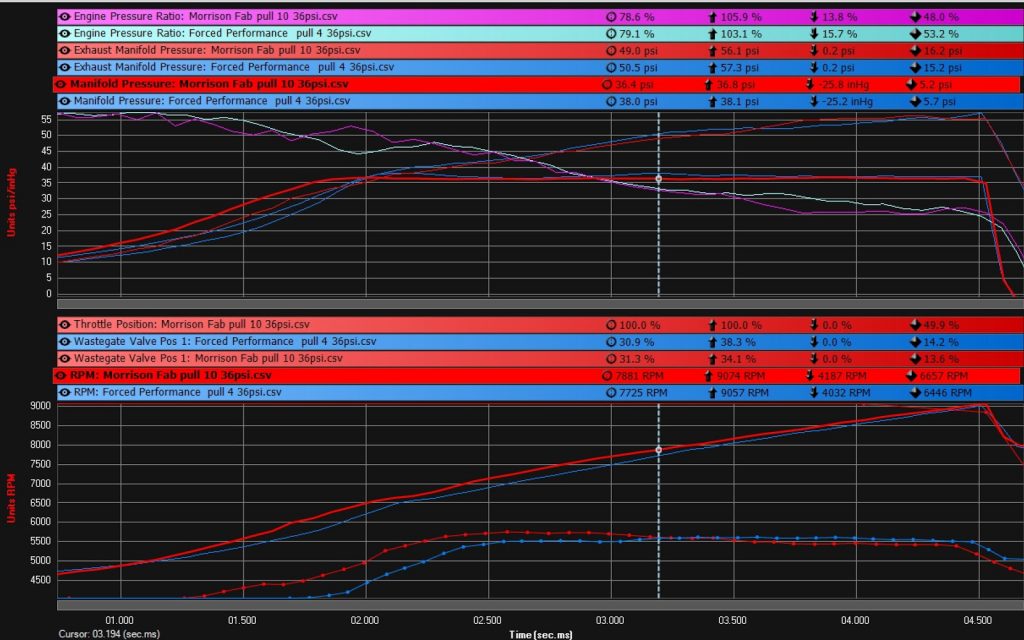
Recap and Conclusions:
From Nathan:
“We believe this data shows that the tubular header had a greater than expected impact on increasing 5000-7500 rpm power (vs 7500-9000rpm expected) and promoting earlier spool-up, with the FP-Zero being the largest of turbo configuration and the highest rpm threshold for spool. As noted in the datalog graphs that are set against time, the MF manifold on all three tests has greatly decreased the time from initial WOT at 4000rpm to hitting boost target around 6500rpm, so much so that the graphs appear to be offset! This illustrates the large gains of 60whp prior to 6000rpm that get the engine/turbo combination spooled up and into the powerband so much earlier. This effect was drastic and easily noted just from hearing the pulls in the dyno room. Simply put, on the street, this manifold will bring in the boost/torque faster and earlier, and will make the vehicle accelerate out of corners and off stoplights drastically better, and greatly increase the fun factor.”
Which setups this manifold would benefit the most:
“While this test is the most extreme parts setup that is biased toward high rpm power, this MF manifold will actually be ideally matched with a “medium range” turbocharger and an engine parts combo (cam/intake) that does not need to operate in the 8500-9000rpm range to achieve peak hp. An example of this would be an FP Green/Red turbo that would be operating only in the rpm range where the MF manifold showed significant gains, without needing to rev to 9000rpm. Effectively, this manifold matches up best with the more typical 500-600hp output and rpm range of the mid-sized bolt-on turbo options commonly available.”
—-
Note: A similar “large runner” MF option isn’t possible, as smooth bends and nice entry/exit angles just don’t fit between the flanges for factory placement. And honestly, a large runner option would lose many of the benefits this manifold offers for 99% of bolt-on setups anyway, while the runner size used was proven to still happy to keep up in the 8-9000rpm and 40psi range, well out of the typical bolt-on turbo rpm range.
*More recent large vs small runner testing has shown our small runner to keep up into the 900whp and 9000rpm range, more than covering bolt-on sized turbos to begin with.
Final Thoughts:
The test results were somewhat unexpected- we initially tackled this experiment expecting to end up with something for all out, far-end of the scale bolt-on turbo setups- the 1%. What happened, however, is we ended up with something that has very substantial gains in the exact rpm range where most bolt-on setups live- which was a pleasant surprise.
There wasn’t a point in the rpm range where the MF manifold didn’t outperform the FP at the same (or less) boost below 8000rpm, which is the end of the usable rpm range for most bolt-on turbos/setups. Even with the boost control issues later in the day. A comparable FP green/red/black will have peak power between 6000 and 7500rpm, so there will only be gains across the board- in power, torque, and spool. We also showed in previous tests, that boost threshold/spool was within ~50rpm of a ported 2g manifold- so power gains will be even more significant with extremely comparable response. Truly a win-win. All in all, we were very excited to see that the manifold kept up on a setup like Nathan’s, but even more excited that it showed extraordinary gains for the 99%!
There isn’t one part of this piece we aren’t proud of and we hope you enjoy it as much as we do!
—-
Product Page: https://morrisonfabrications.com/product/dsm-stock-replacement/
MF Technical Article: https://morrisonfabrications.com/tech/dsm-stock-replacement-manifold-back-to-back-dyno-testing
More info behind the design: https://www.dsmtuners.com/threads/new-product-testing-dsm-stock-replacement.526288/
Details on Nathan’s Talon:
- Forced Performance DSM-Zero Bolt-On turbo. 62mm Xona Rotor 7864 w/ 10cm turbine
- 1G cyl head w/ 1mm OS SS valves & Kiggly Race-Only springs, Kiggly HLA
- GSC S2 274* cams – Adjustable cam gears at 0/0
- 2.0L 6bolt – Manley Turbo-Tuff rods & Wiseco HD pistons. OEM crank/block
- ARP L19 headstuds, ARP main studs, Evo3 MLS headgasket
- Haltech Elite 1500 ECU / Haltech complete wire Harness
- Haltech WB1 wideband, 4X EGT kit, 4x Haltech coils, Kiggly 12T crank trigger, 2gbCAS
- FIC 2150cc Injectors, dual bosch 044 pumps, JMF fuel cell, pump E85
- Magnus V3 intake manifold, S90 throttle body, 18x12x6” FMIC core, 3”/2.5” IC pipes
- TiAl 50mm Q BOV, TiAl MV-R 44mm external wastegate w/ position sensor
- NOS dry system w/ solid state relay – controlled by Haltech ecu (stall aid)
- Morrison Fabrications SS tube o2 housing & wg dumptube set
- Performance Partout rebuilt 1G AWD automatic transmission: Haltech shifted
- Kiggly 6disk end clutch, Trans-Lab shift kit, Welded center diff. Otherwise stock
- IPT restalled 1G OEM converter, Kiggly flex plate, 2G VSS
- JB Designs 300m Xcase, xcase brace, DSS 3.5” alum driveshaft, DSS Axles
- Ksport coilovers, Rota 15×7” Slipstream, Hoosier 26×9.5×15” QTP dot drag tires
- 2860lb total weight w/ driver – NHRA certified safety equipment to 8.50 ET
