The purpose of this dyno visit was to compare the horsepower and torque curves for the DSM Consolidated Runner Top Mount to the well proven Standard Top Mount at moderate boost and power levels. The article weighs heavily on the Consolidated Runner Top Mount as it was the one unproven one. While we found the peak horsepower numbers to be interesting, the other data we collected at the end was far more intriguing and telling.
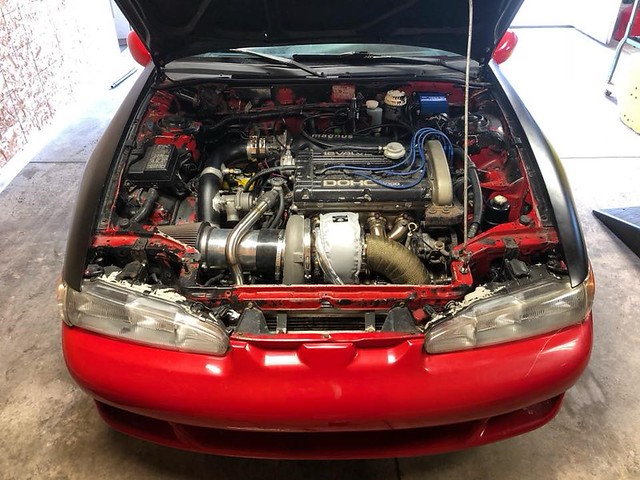
The car used for the testing of the two manifolds was Annika’s 1993 manual AWD Talon named Prototype (for good reason). The setup details pertinent to this testing is:
- GTX4202R (75.8mm inducer) Garett turbo with a 1.0 A/R divided T4 turbine housing
- 2.0 aluminum rod, 10.5:1 CR
- Kelford 284/280 cams
- Magnus cast intake manifold with a stock 1g throttle body, 3” IC piping
- 4” full exhaust
- 2150’s, ECMLink, E67 (67% ethanol winter blend)
Background on where the consolidated runner manifold began: Over 2 years ago, even before we started this business together, we decided to make a manifold that fit very specific needs: Ours. A compact “4-2-1” style design that is built around the twin scroll concept, and able to place the turbo close to the engine, and turbine housing away from the radiator. The goal was to gain mid-range, response, and spool for a badass street car that also had the capacity to do work at the track without sacrificing high RPM efficiency; the last part is key, as most people would look at the merging of the two paired runners into a secondary of the same size and see it as a restriction. Testing was to start this spring or summer but there was a lot of interest and downright curiosity in the design, so a dyno day was scheduled.
The pulls were done on a Dynojet at Late Model Throttle in Waukesha, Wisconsin, on Tuesday, February 27, 2018, and were done about 5-10 minutes apart from one another; the time between swapping manifolds, downpipes, and hotside intercooler pipe took longer, of course (2 hours, to be exact). The downpipe and intercooler pipe off the turbo were kept as close to the same as possible. After initially being strapped down to the dyno, the car never came unstrapped during the entirety of the testing. Timing was kept low to avoid any potential knock limitations from both setups, and the air-fuel ratio (AFR) was roughly dialed in to 11.5:1 (gasoline scale) on pump E67 fuel. The pulls were done starting at 3000 RPM, in as much of a steady state condition as possible, to avoid any spool up advantages. The boost would jump to 0.6-0.8psi just after going wide open throttle on each pull, regardless of which manifold was being used. Coolant temps were between 169 and 180 degrees F, and intake temps between 66 and 70 degrees F as the day went on. The boost is controlled by an air regulator sending a fixed psi to the top port of the wastegate, acting like a stiffer wastegate spring to increase boost. The bottom port was connected to a boost source as normal.
It should be noted that every datalog will be off by 5 degrees of total timing. We installed a Kiggly Racing 2-tooth crank trigger to give much more solid and consistent ignition timing but had to offset the timing tables to account for it being at 0 degrees before top dead center (BTDC) rather than usual base timing of 5 degrees BTDC; adding 5 degrees globally on our timing map put things back to normal.
First are the individual graphs and logs, with overlays and comparisons between the two different manifold designs at the end.
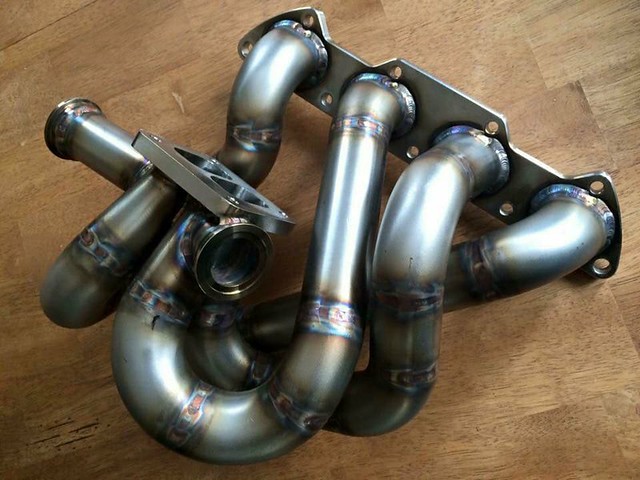
DSM Consolidated Runner Top Mount:
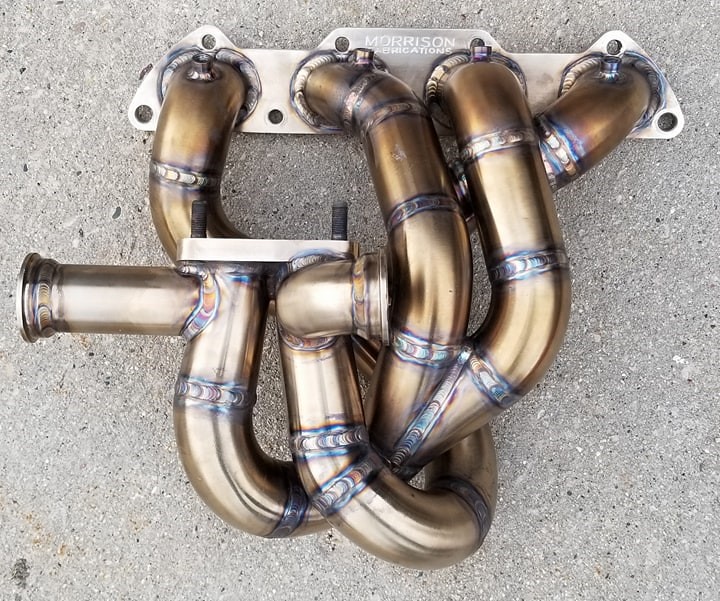
(photo taken after testing)
The first couple pulls were simply getting the AFR dialed in (was in the low 10:1, gasoline scale, range which killed power) and easing into “normal” timing values as the consolidated manifold setup hadn’t been felt out before. We were also getting the hang of operating the dyno, while keeping an eye on things- tuning, start/stopping additional data acquisition loggers, and overall anxiousness. Due to the “figuring out” process, the first pull that was useful/comparable was at 35psi rather than 30-31psi, and only the horsepower curve can be used. The ignition timing lead (what the dyno uses to graph engine RPM and then calculate torque based off the horsepower numbers) picked up some erratic spike/signal and doubled the RPM scale. Rendering the torque curve useless as it was stretched out to 19000 RPM; this was fixed for all pulls onward.
Because of this, the graph is displayed with speed on the bottom axis rather than RPM.
35psi Consolidated Top Mount:
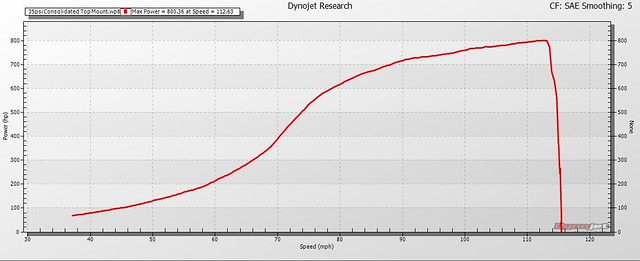
The peak of the graph and power was at approximately 9150 RPM for reference. Peak power numbers weren’t what we were looking at, but an even 800whp was still nice!
Log:

On the next pull, Jeff at Late Model Throttle changed the settings so RPM is gathered off of speed instead of the ignition pick-up, avoiding any future scaling hiccups.
38psi Consolidated Top Mount:
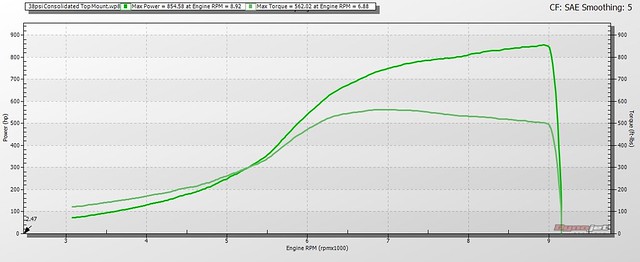
Log:
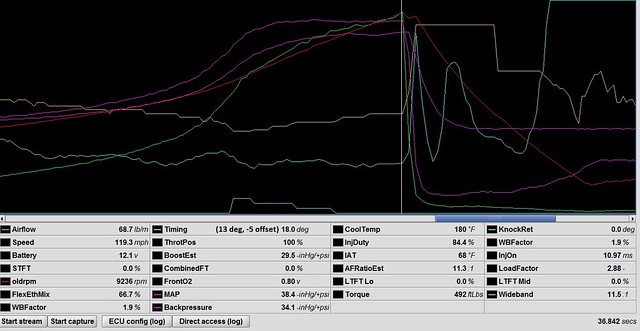
The rev limit is set at 9500 RPM but we cut the pull a little short on accident; a combination of loud and being nervous after hitting the rev limiter on the last pull. The boost was at or just over 38psi throughout the run. Peak KnockRet was 1.0 degree of timing pulled around 6000 RPM.
During our usual check over after the pull, we saw that the coolant overflow was full with some coolant spray around it. Luckily, it wasn’t pushing coolant from the headgasket, but rather the coolant cap that had vibrated lose. After that scare, we decided it was a good time to call 38psi enough for now and swap to the standard top mount. The injector duty cycle was getting a bit up there with the 2150’s, as well.
DSM Standard Top Mount:
We had some lunch to let the car cool down and then started swapping the hot parts around to the standard top mount. We were spinning the rollers again in exactly 2 hours.
The first pull was rich again and the second pull was acceptable with a gradual leaning out to 12:1 AFR (gasoline scale) at the end of it. It was done at 31psi which doesn’t have an accompanying consolidated graph but is still nice to add.
31psi Standard Top Mount:

Log:

35psi Standard Top Mount:

Log:

38psi Standard Top Mount:
Log:

The same timing maps were used; however, the LoadFactor was higher, putting it into a higher load/lower timing part of the map, resulting in lower timing than the consolidated manifold at near the same boost. It’s also worth noting that the fuel tables required approximately 5% higher volumetric efficiency (VE) than the consolidated manifold at 9500 RPM and was still a little on the lean side (11.7 AFR, gasoline scale). The VE table doesn’t slowly drop off at high rpm on this manifold as you would typically expect from almost any other setup. The boost was at or just under 38psi during the pull. Peak KnockRet was 1.4 degrees pulled at around 7000 RPM.
Near the end of the pull, coolant started spraying out from behind the timing cover. We haven’t had a chance to see what it was exactly that started leaking, but it’s unlikely that it made much (if any) impact on the dyno run itself. This can be surmised from the standard top mount graphs tracking nice and predictably as the boost is raised in each successive pull.
31psi vs 35psi vs 38psi Standard Top Mount Horsepower:

An interesting note (that can be seen from the logs) is the RPM cut off point was closer to 9500 in each pull; however, the dyno graphs look to have a slightly lower RPM peak as the power goes up. A quicker gain in RPM at higher power causing a delay or shift of some sort?
31psi vs 35psi vs 38psi Standard Top Mount Torque:

And now for the intriguing parts; overlay comparisons between the two manifolds!
35psi Consolidated vs 35psi Standard Top Mount Horsepower:

Sadly, we couldn’t overlay the two torque graphs or have RPM as the lower axis due to the ignition pick up issue skewing the RPM scale.

The section selected is at 6000 RPM. At this point on the 35psi pulls, the consolidated manifold is making 40 more horsepower at the wheels than the standard manifold. Up top, the standard generates 11 more horsepower at the wheels vs. the consolidated manifold.
At 38psi, the consolidated manifold starts to really come into its own with a large mid-range bump at spool up. The graphs both have the proper RPM scaling so torque can be directly compared as well (and paints a nice picture of the character to each).
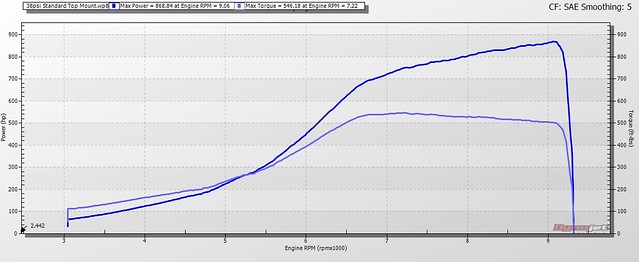
38psi Consolidated vs 38psi Standard Top Mount Horsepower:


Again, at 6000 RPM, the consolidated is making 90whp more than the standard top mount. The difference up top is 14whp higher with the standard top mount, although the pull was cut a little shorter with the consolidated so the peak numbers may have been slightly closer. It should be noted that boost and timing were higher on the consolidated (38.4psi, 13 degrees) vs the standard (37.9psi, 11.6 degrees) because of the difference in LoadFactor, with the standard top mount being at a higher “load” despite slightly less boost. Accounting for this – although it would require a different timing map – would allow the standard top mount to generate an even larger horsepower advantage. The boost controller was set in the exact same position for both pulls despite the standard manifold seeing 0.5 psi lower boost in some spots.
The torque curve is particularly intriguing!
38psi Consolidated vs 38psi Standard Top Mount Torque:
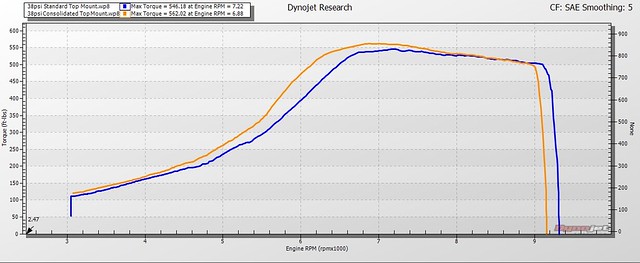
The consolidated manifold makes noticeably more torque until just after 8000 RPM and spool is also a few hundred RPM lower. Most of the additional torque in the mid-range comes from the boost being generated sooner; however, it is indicated that there is more torque at the same boost as well around this RPM range. After 8500, the standard manifold is creating more torque despite a 0.2-0.5 psi disadvantage.
Some graphs gathered from logged data during each 38psi pull-
Boost by RPM

Drive pressure by RPM
Turbine drive pressure was logged in ECMLink through a 5 bar MAP sensor. A pulse dampener was used to smooth the pressure readings from the individual exhaust pulses. The readings were taken from #4 exhaust port on each manifold and indicate how much average pressure in the exhaust manifold was required to create a certain boost level in the intake manifold. Anything 1:1 is considered pretty good, as some setups can go into the 2:1 or higher range, with much more backpressure in the exhaust manifold than boost in the intake. A GTX4202R (76mm inducer) at 38psi on a 2.0 liter engine isn’t being pushed that hard and the low drive pressures reinforce this.
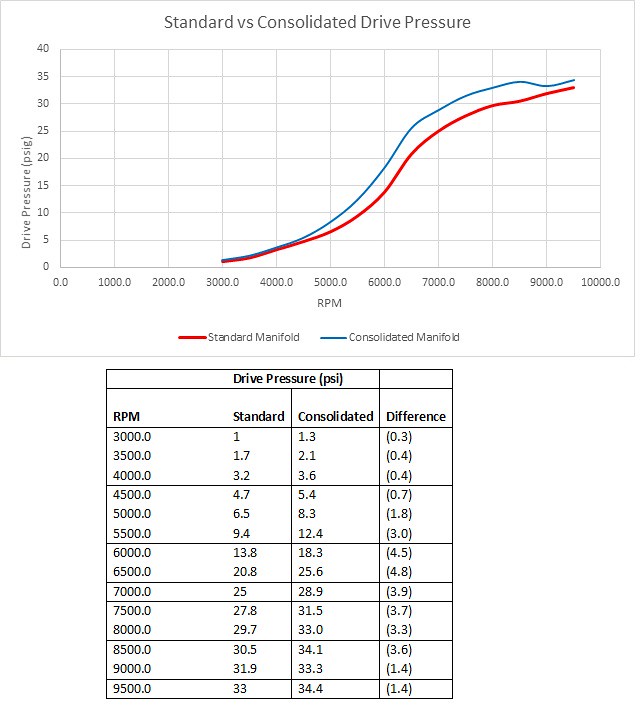
The consolidated manifold is much more eager to make boost (the boost controller was set exactly the same on the two 38psi runs) and also drive pressure vs the standard manifold. The drive pressure tracks along with boost pressure, with a trend to increase at higher RPMs. The higher drive pressure around 6000 RPM is due to the consolidated manifold creating more boost at that point. Interestingly, the consolidated manifold’s drive pressure starts to level off a little at high RPM. This was seen in each of the different logs at various boost levels.
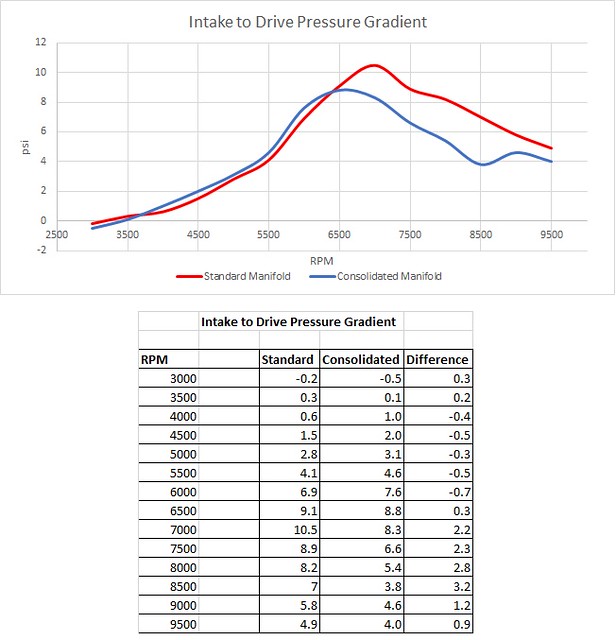
Boost vs. Drive Pressure by RPM
Conclusions:
The most important aspect to take away from this is the merging of the paired runners in a divided manifold well before the turbine housing on a 4-cylinder did not pose as a restriction in this test; the drive pressure at high RPM being within 1 to 1.5psi reinforces this. It makes sense as it’s exactly what happens in a divided turbine housing anyway, but the consolidated manifold just does it at a different point: in the runner itself rather than typically at the collector. It also aids in spool up and mid-range torque in a fairly significant way for simply a manifold change with the same size primaries; whether by a decrease in volume between the turbine housing, and/or some effects inherent to a 4-2-1 style manifold. The exhaust should be thought of as a pulse, not just a mass flow. The individual pulses, their order, and how they behave as they travel through the runners can be taken advantage of. There was a small disadvantage in peak power numbers at high RPM, but we feel there is something else at play that makes the standard top mount start to shine after that point, rather than the consolidated being restrictive.
We would have still been happy if the results were identical, as the consolidated design allows for a more compact “collector” area and offers a turbo placement that would likely be impossible with a conventional collector. Although each specific placement and design have their own advantages, getting the turbine housing away from the radiator and fans can be beneficial, especially on a street car where cooling is a big priority. The fact that spool and mid-range were increased a quite noticeable amount was even better considering it can be a benefit for both a street car and a track car. Power was similar, as the trade off at this power level is between 1.5-2% at peak RPM/power, with the power discrepancies starting after 8,000-8500 RPM. The advantage at peak torque was about 3%, while being as high as 15% around 6000 RPM. The dyno pulls for the consolidated manifold were all noticeably shorter in time due to more a little more area under the curve getting the dyno rollers up to speed sooner.
There are always things that may shift the power/torque curves around with give and take here and there such as length, runner size, and overall design but it’s all about what will suite your setup and your needs that decides what is “best.” For some setups, a decent increase in mid-range isn’t worth even a small reduction in top end power. For others, a small reduction in top end power can be well worth the extra mid-range when the useable RPM range is lower to begin with or the turbo runs out of steam by that point anyway. There are other things, like how tight the radius of the bends are and how well the runner transitions are from the port and to the turbine housing that can be an overall advantage either way.
With the GTX4202R being a 76mm inducer turbo on a 2.0 liter engine, the spool was still very stout on a dyno (usually later) in 3rd gear for both manifolds. The standard top mount is no slouch to compare against to begin with. Positive boost was seen immediately after 3000 RPM and 25psi between 6000 and 6500 RPM. The plotted values vs RPM make it seem like the rest of the boost takes a while to ramp up but in reality it’s a split second as RPMs are rapidly rising and it’s under full steam. In 4th gear, the consolidated manifold has seen 23psi as soon as 5200 RPM on the GTX4202R but there was significant compressor surge starting at that point; meaning it can’t physically spool any sooner with that turbo and displacement. The driving experience for the standard top mount makes boost feel very deliberate and linear – boost doesn’t happen on accident and feels like it never stops. The consolidated top mount is a bit more responsive (we are still talking about a 76mm turbo) with a little more of a “hit” to it that tends to want to break the tires loose. Both are more than enough to make the car very streetable without struggling to gain speed even at low RPM with that frame turbo.
The volumetric efficiency (VE) tables of the consolidated manifold required more fuel to maintain the same AFR, meaning it was flowing more air, and also creating more mid-range (shown from the dyno) even at the same boost. The standard top mount required more fuel from a higher VE, especially after 8000-8500 RPM (especially 9500 RPM), giving it more total airflow and requiring less turbine drive pressure on top of it. While both manifolds continued to make power at the tested 9500 rev limit, the standard top mount showed no signs of letting up. The consolidated manifold really shined at around 6000 RPM, and we would really like to see what happens with a (smaller) turbo sized to utilize that RPM more, rather than just spooling up at that point.
With more boost than what we were able to test here, we expect to see the mid-range of the consolidated manifold get augmented even more over the standard manifold, but with the standard top mount making its high RPM advantage known. Even with just a 3 psi increase in boost, the turbo and both manifolds were responding extremely well with between 54whp and 57whp gained from 35 to 38psi. We don’t think we’ll necessarily see a “limit” to power from one manifold to the other, but rather a different curve for each, shifted up or down by how much boost is used. A smaller turbo, such as something in the 60mm range, would likely show an overall benefit with the consolidated manifold’s curve. A larger turbo, such as something in the 70mm+ range, would likely benefit overall from the curve of the standard top mount; especially when it is closer to its boost/power potential. For what it’s worth, the standard top mount is what we are keeping on the car; with a sub 70mm turbo going on the consolidated top mount as it’s what it was originally designed for.
We are extremely happy with the results and to be able to say that each top mount manifold design that we offer has its place, in a big way.
A big thank you to the following:
- Scott Glassbrook at FTY Racing for helping make this all possible with their data acquisition systems.
- Our wonderful friends Jesse and Tyler for letting us borrow their truck and trailer.
- Jeff and his incredible staff at Late Model Throttle in Waukesha, WI for letting us take over their dyno and all of their help throughout the day (and letting us just do our own thing!).
- Ron Shearer at Shearer Fabrications, and Kevin and Erin Kwiatkowski at Kiggly Racing for all of their guidance and support.